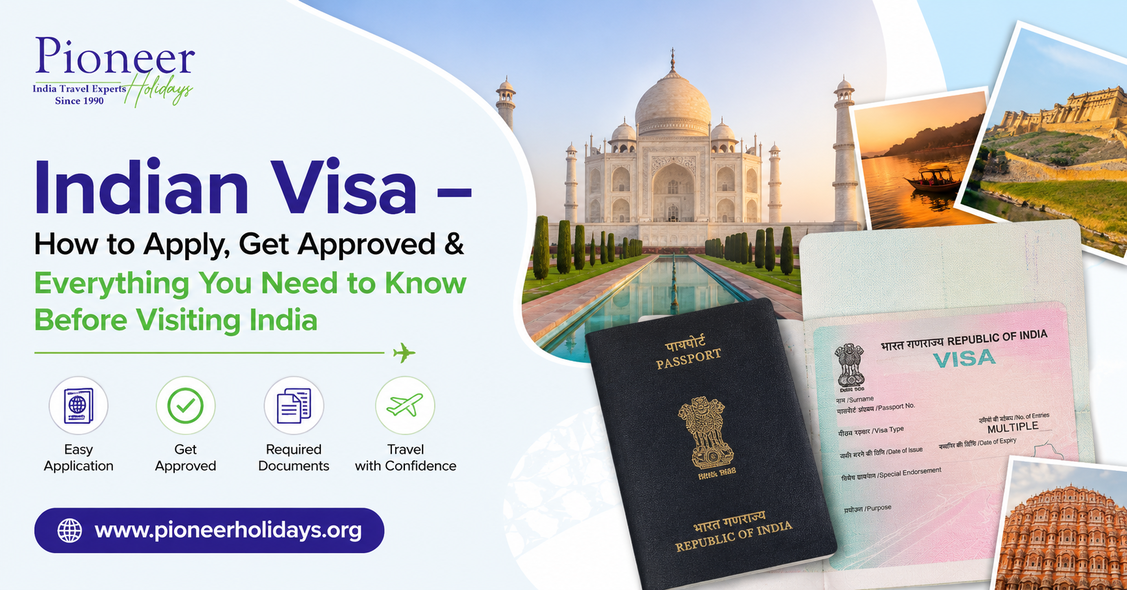
So you finally decided to visit India. Amazing choice.
But then you opened a browser and searched “how to get an Indian visa” — and now your head is spinning. Too many websites. Too many confusing forms. Too many people saying different things.
I get it. I really do.
The truth is, getting an Indian visa is not that hard. It just looks scary because there is a lot of information floating around — and most of it is written in a way that confuses normal people.
So I am going to explain everything in plain, simple language. Like a friend sitting across from you at a coffee shop, walking you through every single step.
By the end of this post, you will know exactly what to do, what to avoid, and what to expect when you land in India.
Let’s start.
What Is an Indian Visa?
A visa is an official permission that lets you enter a foreign country. Think of it like a ticket. Without it, the immigration officer at the airport will simply not let you in.
India requires most foreign nationals to get a visa before they travel. There are a few countries that get visa-on-arrival or visa-free entry — but for most travelers from the USA, UK, Europe, Australia, and Canada, you need to apply in advance.
The good news? India has made this process much easier in recent years. Most tourists no longer need to go to an embassy. You can apply from your laptop or phone.
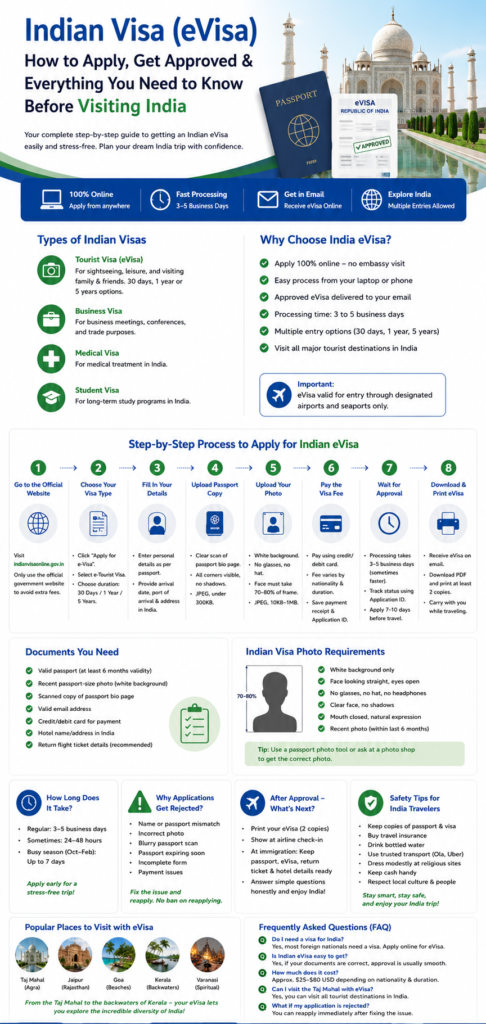
Types of Indian Visas
India offers several types of visas depending on why you are visiting. Here are the most common ones:
Tourist Visa This is for people who want to explore India — see the Taj Mahal, travel to Rajasthan, relax in Goa, or experience Varanasi. It is available for different durations, and the most popular option is the 1-year multiple entry tourist visa.
India eVisa (Electronic Visa) This is the online version of the tourist visa. You apply on a website, pay online, and receive your visa by email. No embassy visit needed. This is what most tourists use today.
Business Visa For people attending meetings, conferences, or business dealings in India. This requires more documentation than a tourist visa.
Medical Visa For those traveling to India for medical treatment. India is becoming a popular destination for affordable, high-quality medical care.
Student Visa For people planning to study in India for a longer period.
For the purposes of this blog, we are going to focus on the eVisa for tourism — because that is what 90% of first-time travelers need.
Why the India eVisa Is the Best Option for Tourists
The India eVisa is honestly the easiest way to visit India as a tourist. Here is why travelers love it:
- You apply 100% online from home
- No embassy visit, no long queues
- You get the approved visa in your email inbox
- The process usually takes 3 to 5 business days
- You can apply for 30-day, 1-year, or 5-year options depending on your passport country
- It allows double or multiple entries depending on duration
- You can visit the Taj Mahal, Rajasthan, Delhi, Goa, Kerala — everywhere you want
One thing to remember: the eVisa has specific entry points. You must enter India through one of the designated airports or seaports. Most major international airports are included, so for regular tourists flying in, this is not a problem at all.
Step-by-Step Process to Apply for an Indian eVisa
Okay. This is the part everyone wants. Let’s go through every step slowly.
Step 1 – Go to the Official Indian Visa Website
The official government website for Indian visa applications is: indianvisaonline.gov.in
Be very careful here. There are many unofficial websites that charge extra fees and create confusion. Always use the official government link. Bookmark it.
Common mistake: Many travelers land on third-party visa agency websites that look very similar to the official site. They charge 2x or 3x the actual visa fee. Always double-check the URL before entering your details.
Step 2 – Choose Your Visa Type
Once you are on the website, click on “Apply for e-Visa.” You will then choose the purpose of your visit. For tourism, select e-Tourist Visa.
You will also see options for 30 days, 1 year, or 5 years. Most travelers from the USA, UK, Australia, and Canada go with the 1-year multiple entry eVisa — it gives you flexibility and good value.
Tip: Choose carefully. Once you submit the form, you cannot change the visa type.
Step 3 – Fill In Your Personal Details
Now the actual form begins. This is where many people make mistakes. Take your time here. Do not rush.
You will be asked for:
- Your full name (exactly as on your passport)
- Date of birth
- Nationality
- Passport number
- Passport expiry date
- Your home country address
- Your India arrival date
- Port of arrival (which airport you are flying into)
- Your address in India (hotel name is fine)
Very important: Your name must match your passport exactly. Even a small spelling difference can get your application rejected or cause problems at immigration.
Another tip: Have your passport next to you while filling the form. Do not type from memory.
Step 4 – Upload Your Passport Copy
You need to upload a scanned copy or clear photo of the front page of your passport — the page with your photo and all your personal information.
Make sure:
- The image is clear and not blurry
- All four corners of the passport page are visible
- There are no shadows or reflections
- The file size is within the allowed limit (usually under 300KB in JPEG format)
Mistake to avoid: Many people upload a dark or blurry photo taken with a bad phone camera. The application might get rejected because of this. Use good lighting or scan the page if possible.
Step 5 – Upload Your Passport Photo
This is separate from the passport copy. You need a recent personal photograph of yourself. India has specific rules for this photo:
- Plain white background only
- Face looking straight into the camera
- No glasses
- No hats or head coverings (exceptions for religious reasons)
- The face should take up 70-80% of the frame
- File size: 10KB to 1MB in JPEG format
Tip: If you are not sure whether your photo meets the requirements, use an online passport photo tool. There are free tools that automatically resize and format your photo to Indian visa standards.
Common mistake: Uploading a selfie with a colored background or wearing sunglasses. This causes rejection almost every time.
Step 6 – Pay the Visa Fee
Once you have filled the form and uploaded your documents, you will be taken to the payment page. You can pay using:
- Credit card (Visa, Mastercard)
- Debit card
- Some countries also have PayPal or other options
The fee depends on your nationality and the visa duration. As of recent times, fees are approximately:
- USA, UK, Australia, Canada: Around $25 USD for 30 days, and $40–$80 USD for longer durations
What if payment fails? This happens more than you think. If your card gets declined, try a different card or contact your bank. Sometimes banks block international transactions for security reasons. Just call your bank and let them know you are making a payment to an Indian government website.
Keep your payment receipt. Take a screenshot. You will need the Application ID for tracking.
Step 7 – Wait for Approval
After payment, you wait. The Indian government usually processes eVisa applications within 3 to 5 business days. Sometimes it comes faster — even within 24 hours. But do not cut it too close.
Recommended: Apply at least 7 to 10 days before your travel date. Do not apply the day before. Seriously.
During this time, you can track your application status on the same official website using your Application ID and passport number.
You will receive an email notification when the visa is approved.
Step 8 – Download and Print Your Visa
When your visa is approved, you will get an email with a link to download your eVisa. This is a PDF document.
Print it. Print at least 2 copies.
Even though it is electronic, the immigration officer at the Indian airport may ask to see a printed copy. It is best to have it ready. Keep one copy in your carry-on bag and one in your checked luggage — just in case.
Documents You Need for Indian eVisa
Here is a quick checklist of everything you need before you start the application:
- Valid passport (must be valid for at least 6 months beyond your travel date)
- Recent passport-size photograph (white background, no glasses)
- Scanned copy of your passport front page
- Valid email address (your visa will be sent here)
- Credit or debit card for payment
- Hotel name or address in India
- Return flight ticket information (not always asked but useful to have)
Indian Visa Photo Requirements
Let me say this again more clearly because this is one of the top reasons applications fail.
Your photo must have:
- White background only — not cream, not grey, not a wall at home
- Clear face — full face, both ears slightly visible
- No shadows on the face or background
- Eyes open and looking directly at the camera
- No headphones, no glasses, no hat
- Mouth closed — natural expression
- Recent photo — taken within the last 6 months
If you are not sure, ask someone at a pharmacy or photo shop to take a proper passport photo. They know the requirements.
How Long Does Indian Visa Approval Take?
For the eVisa, the typical timeframe is:
- Regular processing: 3 to 5 business days
- Sometimes faster: 24 to 48 hours
- Busy season (Oct–Feb): Can take up to 7 days
Apply early. This is really the only strategy you need. Give yourself at least 10 days before your trip. If you are traveling during Indian festivals or peak tourist season, apply 2 to 3 weeks in advance.
Common Reasons Why Indian Visa Gets Rejected
This is important. Read carefully.
Mismatch in name or passport details Your application details must match your passport exactly. Even a middle name issue can cause a problem.
Photo does not meet requirements As I explained above — wrong background, glasses, poor quality. This is a very common reason.
Passport copy is blurry or incomplete The scanned passport page needs to be crystal clear.
Too close to passport expiry date Your passport must be valid for at least 6 months after your planned arrival in India.
Incomplete form Leaving fields blank or entering wrong information causes immediate problems.
Payment issues If payment failed but the form was submitted, the application may not be valid.
What to do if rejected? You can reapply. There is no ban on reapplying. Just fix the error that caused the rejection and submit a fresh application. You will need to pay the fee again.
What Happens After Your Visa Is Approved?
Great news — you have your visa! Now what?
Download and print it. Save the PDF to your phone too, just as a backup.
At the airport before departure: When you check in for your flight to India, the airline staff may ask to see your visa. Show them the printed copy or your phone.
Arriving at Indian Immigration: When your flight lands in India, you will join the immigration queue. Have these ready:
- Your passport
- Your printed eVisa
- Your return flight ticket
- Hotel booking confirmation (print this too if you can)
- A pen to fill the arrival card (they give you one on the plane or at the airport)
What questions do immigration officers ask? They keep it simple for tourists. Common questions are:
- Why are you visiting India?
- How long do you plan to stay?
- Where will you be staying?
- Do you have a return ticket?
Answer honestly and calmly. Smile. Immigration officers in India are professional. If you have your documents ready, the whole process takes just a few minutes.
After immigration, you collect your bags and head out. India welcomes you!
Do You Need Hotel Bookings Before Applying?
The eVisa form asks for an address in India. You can put your hotel name and address here. You do not need a confirmed booking at the time of applying — but it helps to at least know where you plan to stay for the first night.
If you have not booked anything yet, just put a well-known hotel in the city you are arriving in. You can always change your plans later. Immigration officers sometimes ask where you are staying, so having at least your first hotel booked is a good idea.
Can You Apply from a Mobile Phone?
Yes, you can. The official Indian visa website works on mobile. But honestly, it is much easier on a desktop or laptop. The form is long, and uploading photos and passport scans is easier on a bigger screen.
If you only have a phone, use it in landscape mode and take your time. Make sure your phone’s camera captures clear images of your passport.
Safety Tips for First-Time Travelers in India
India is an incredible country with millions of happy tourists every year. But like any foreign destination, a little preparation goes a long way.
- Keep digital and physical copies of your passport and visa at all times. Email them to yourself too.
- Buy travel insurance before you leave. This covers medical emergencies, trip cancellations, and lost baggage.
- Drink bottled water. Tap water is not safe for tourists in most parts of India.
- Be careful with street food if you have a sensitive stomach. Start with small amounts and see how your body reacts.
- Use licensed taxis or ride apps like Ola and Uber rather than random cabs at airports.
- Dress modestly when visiting religious sites like temples and mosques. Cover your shoulders and knees.
- Keep small cash handy. Many local shops and markets are cash-only.
- Learn a few words in Hindi — “namaste” for hello, “dhanyavad” for thank you. People will love you for it.
India is loud, colorful, overwhelming, and absolutely magical — all at the same time. Go with an open heart.
Best Places to Visit in India with a Tourist eVisa
Here is the exciting part. With your India eVisa, you can visit every single tourist destination in India. Here are some favorites:
Agra – The Taj Mahal This is the one that makes people fly thousands of miles to India. The Taj Mahal is a breathtaking white marble monument built in the 17th century. Seeing it at sunrise is one of those life experiences that stays with you forever. If you want a guided experience, check our Taj Mahal Tour Packages — we handle everything so you can just enjoy the moment.
Jaipur – The Pink City Jaipur is the capital of Rajasthan. It has stunning forts, colorful bazaars, and warm-hearted people. The Amber Fort alone is worth a full day. Pair Jaipur with Agra and Delhi with our Golden Triangle Tour Packages — the most popular India route for first-time visitors.
Delhi India’s capital is a city of contrasts. Ancient mosques, modern malls, street food that makes your eyes water with joy — Delhi has it all. The Red Fort, Humayun’s Tomb, Qutub Minar, and India Gate are must-sees.
Rajasthan Rajasthan is like stepping into a fairy tale. Beyond Jaipur, the cities of Jodhpur (the Blue City), Udaipur (the City of Lakes), and Jaisalmer (the Golden City) are absolutely stunning. Many tourists consider Rajasthan the highlight of their India trip.
Varanasi One of the oldest living cities in the world. Varanasi sits on the banks of the Ganges River and is sacred to Hindus. Watching the evening aarti (prayer ceremony) by the river is one of the most spiritual experiences you can have anywhere on earth.
Goa Beach lovers and party people — Goa is for you. Gorgeous beaches, Portuguese-influenced architecture, fresh seafood, and a relaxed vibe. It is a perfect contrast to the intensity of Northern India.
Kerala Known as “God’s Own Country,” Kerala is famous for its backwaters, lush hills, Ayurvedic wellness retreats, and incredibly fresh food. If you need to unwind and breathe in nature, Kerala is the place.
The best part? Your single eVisa lets you travel freely across all of these destinations during your stay.
Final Thoughts – India Is Waiting for You
Let me be honest with you for a moment.
India can feel overwhelming before you arrive. The visa form, the photos, the documents — it all seems like a lot. And then you land, and everything hits you at once — the colors, the smells, the noise, the warmth of the people.
And then something shifts. You start to see it differently. You start to love it.
India is not a country you visit once and forget. It is a country that stays with you. People who come here for two weeks keep coming back for years.
So do not let a visa form stop you. Follow the steps in this guide, apply early, and start browsing our India Tour Packages while you wait for approval. Your trip is closer than you think.
Take that trip. See the Taj Mahal. Eat the butter chicken. Sit by the Ganges. Ride through the deserts of Rajasthan.
India is ready for you. Are you ready for India?
Frequently Asked Questions (FAQ)
Do I need a visa for India?
Most foreign nationals — including those from the USA, UK, Europe, Australia, and Canada — need a visa to enter India. Apply for the eVisa online at least a week before travel.
Is the Indian eVisa easy to get?
Yes. If your documents are correct and your photo meets the requirements, most eVisa applications are approved without any issues.
How long does Indian visa approval take?
Usually 3 to 5 business days. Sometimes faster. Apply at least 10 days before your travel date to be safe.
How much does Indian eVisa cost?
It varies by nationality and duration. For US, UK, Australian, and Canadian citizens, it is roughly $25–$80 USD depending on the type of visa.
Can I visit the Taj Mahal with an eVisa?
Absolutely yes. Your India eVisa allows you to visit all tourist destinations including the Taj Mahal, Jaipur, Delhi, Goa, Kerala, and more.
What if my Indian visa application gets rejected?
You can reapply immediately after fixing the reason for rejection. Common reasons are photo issues, blurry passport scans, or mismatched name details.
Do I need to print the eVisa?
Yes. Print at least two copies and carry them with you. The immigration officer at the airport may ask to see it.
What questions will immigration ask me?
Simple ones — why are you visiting, how long are you staying, where are you staying, do you have a return ticket. Be calm and honest.
Is India safe for first-time travelers?
India is visited by millions of tourists every year safely. Use common sense, stay aware of your surroundings, use trusted transport apps, and you will have a wonderful trip.
Can I apply for an Indian visa from my phone?
Yes, but it is easier and safer to apply from a laptop or desktop computer.
Thinking of visiting Agra and the Taj Mahal? Pioneer Holidays offers private, guided Taj Mahal tours from Delhi and across the Golden Triangle. Get in touch with us — we would love to help you plan the perfect India trip.